Managing Avalanche Risk Part 6: Exposure and Vulnerability in the Planning Process
In this fireside chat series on managing avalanche risk, Karl Klassen will pass along the wisdom acquired from his mentors and the knowledge learned from a distinguished career as avalanche forecaster and backcountry ski guide—to help you better understand avalanche hazard and how to manage the inherent risk you face.
So, we’re five articles in, and we haven’t even touched the snow yet…but we are getting closer. In this, the last piece in the 2021-22 season, we’ll take a look at the final step in the pre-trip portion of your risk-management process: planning to minimize exposure and vulnerability.
In my professional life, I joke with my guests that I spend as much time figuring out where it’s safe to ski and putting together backup plans as I do actually making turns. In fact, it’s true—but this didn’t come naturally or easily. In the very early days, I just went skiing with no plan in mind at all other than to get to the top of the slope and slay the pow I so desired. Eventually, I learned how to analyze and forecast avalanche hazard, but still didn’t put the whole picture together. Then, when I became an entry-level guide, reality hit hard: I realized I needed to use my hypothesis about hazard (avalanche forecast) to come up with a proposal for where it was reasonable to ski (my run list) before I could even consider taking people anywhere near avalanche terrain (everywhere I wanted to ski).
And then one day, during a driving snowstorm in a total whiteout with paying clients, I found myself in the terrible position of not knowing for sure what was above or around me in terms of avalanche terrain. This made it impossible to know what my exposure and vulnerability were, much less figure out how to reduce my risk by managing them. I do not wish this experience on anyone. I was literally sick to my stomach for several hours as I faked my way through that segment of a multi-day trip in serious terrain.
I’m here to tell the tale, so I got away with it, but what happened to me on that day made it crystal clear that no matter how much time I spend on my avalanche forecast, how well-defined my run list is, and how expert I am at recognizing avalanche terrain, it’s all completely useless if you don’t know where you are and can’t see what’s above or around you. This doesn’t only happen when visibility is poor. For instance, even on a perfectly clear day, if you are low on a slope or in a valley, you may not be able to see an alpine start zone above you, meaning you don’t know how exposed or vulnerable you might be to what may come down on you from above.
One day, during a driving snowstorm in a total whiteout with paying clients, I found myself in the terrible position of not knowing for sure what was above or around me in terms of avalanche terrain.
To help you identify where and when you are exposed to avalanche hazard in the trip-planning process, you need to be able to use tools like terrain imagery, maps, navigational instruments, and have some way of recording routes so you can stay on track when in the field. Back in the day, this was all analog: guidebooks, aerial photos, paper maps, compass and protractor, pencil lines on a map, and waypoints in a notebook. Today, we use a combination of analog and digital tools, including things like 3D satellite visualization, digital mapping apps, and GPS devices with pre-loaded waypoints. If any of this is Greek to you, you’re not ready, and what you need to know is beyond the scope of this series. It’s almost impossible to learn this stuff without in-person instruction and practice under the guidance of someone who has experience in navigation, trip preparation, and route planning.
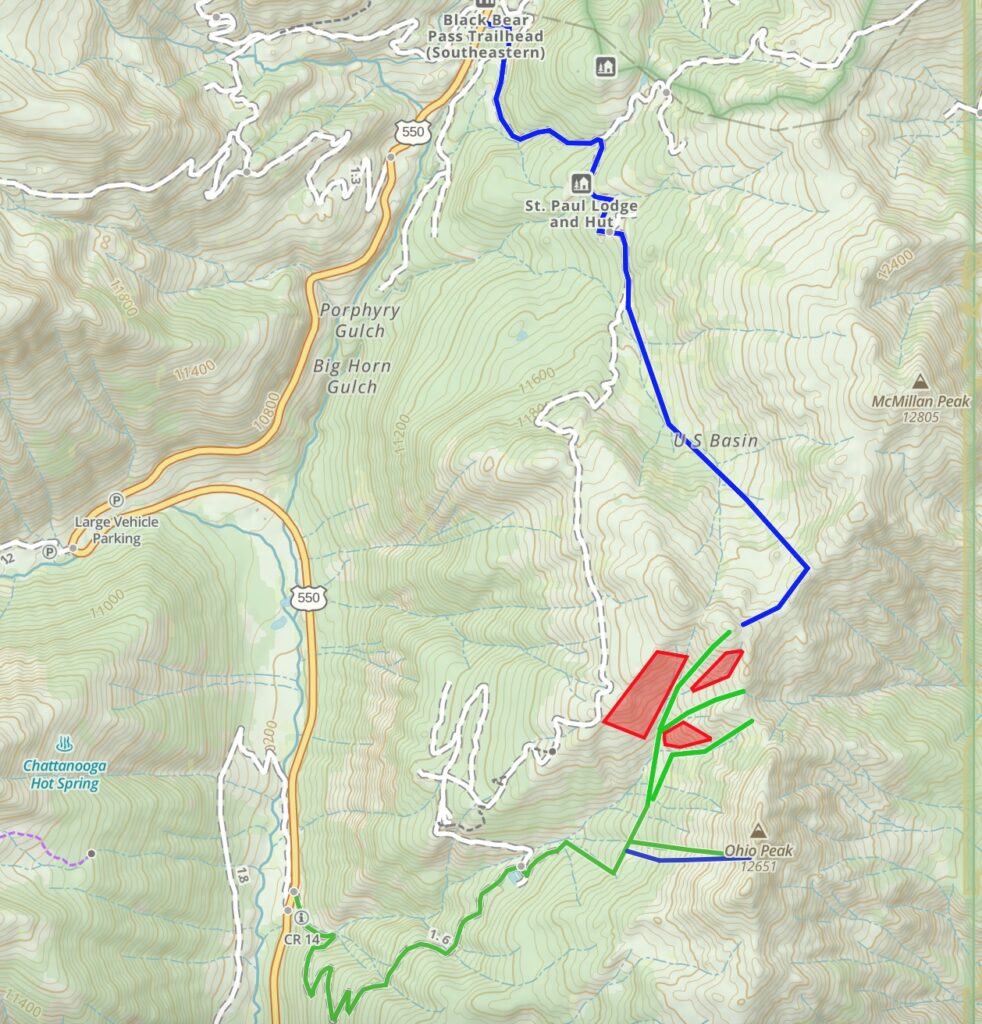
As of the end of Part 5, we used our avalanche forecast to create a run list that consists of no-go zones, red runs, green runs, and perhaps some details about terrain for features to avoid while skiing. Now, you need to think about the tour itself and plan your route to recognize and avoid no-go/red areas. You also need to examine the green zones and terrain, looking for route options that reduce exposure to hazard and minimize your vulnerability if you are caught in an avalanche.
Exposure has to do with whether you are in a place where avalanches might affect you.
Exposure has to do with whether you are in a place where avalanches might affect you. The key points are to know where you are exposed to avalanches, when exposure will occur, how long your exposure time is, and how many people are exposed at any given time. For example, if your avalanche problem is wet, loose avalanches on a spring day in the afternoon, and if you will only be exposed in the morning to the terrain where those avalanches may occur, your exposure is zero. If you arrive at that slope late and the snow is schmooey, for example, well, there’s a big difference between being on the slope for 2 minutes versus an hour, or with one person versus five.
Minimizing exposure first involves avoiding avalanche terrain as much as possible. This could mean plotting a route that sticks to lower angle terrain and avoids travelling under overhead slopes rather than heading straight up or across areas where an avalanche might affect you. I’ll do this on ascent routes wherever I can—why expose myself when climbing if I don’t have to?
Certainly there are times on an ascent, and for sure on descents, where I need to risk exposure to avalanches. This is part of the game. But even when I’m on green run on a green danger day, I think carefully about where I am in relation to potential hazard, time of day, length of exposure time, and how many people are on the slope at once. And I work hard to minimize these exposure factors as much as possible. I like steep and deep as much as anyone, so the absolute safest route may not be my Plan A, but it’s going to be a backup plan for sure. These are things we often don’t think of before we leave—most people think managing exposure is something done in the field. But I find planning and thinking about exposure ahead of time helps me be proactive in the field rather than reactive.
Vulnerability, on the other hand, is how susceptible you are to injury if you are caught. If you’re in a railway locomotive and get hit by a size 2 avalanche, you are not vulnerable. But that same size 2 catching you on skis where there’s a cliff below you makes you much more vulnerable. An airbag reduces the chance of full burial. Rescue gear like a transceiver, probe, and shovel makes you less vulnerable by making quick companion rescue possible.
Speaking of rescue gear, here’s a useful sidebar: I’d be willing to bet that most of you do not practice often enough. Is pulling the trigger on your airbag a completely familiar action that’s intuitively the first thing you do if caught in a slide? Can you pinpoint two or three signals from a buried transceiver in just a few minutes? Do you apply the most effective probing technique without having to think about it? Do you know how to set up the most efficient shovelling system given the terrain, depth of burial, and number of people shovelling? If you shrugged your shoulders when I asked you these questions, you need to practice more. Probably lots more.
OK, back to reducing vulnerability when trip planning. For me, this is all about terrain traps. If your hazard hypothesis is correct and your list of green runs is on the mark, it’s unlikely you’ll be caught in a large avalanche. But it’s still possible to be involved in something small, and even the smallest of avalanches can be deadly if they catch you in a bad place. I work very hard in the planning process to identify where I might encounter terrain traps and figure out ways to stay away from them.
If you need me to make a complete list of terrain traps, stop reading now and go sign up for an avalanche course. But here are some of the ones that give me the willies.
- Tree wells: The closest call ever for me was a tiny sluff that hit me from behind and pushed me upside down into a tree well. If it were not for pure luck when a couple of my guests saw my ski sticking out, I would not be here talking to you today.
- Open water: Doesn’t take much if you’re off balance and carrying a big pack to get pushed headfirst into a creek. This scares the crap out of me.
- Cutbanks on roads: While alone late at night snowmobiling to work, I once ricocheted off the cutbank of a logging road and dumped my sled into the ditch. A small surface hoar slide came off a pillow above me and completely covered me. Fortunately, it was a very soft slab of low-density snow and I was able to dig myself out, but it was an eye-opener for sure.
I know considering exposure and vulnerability in the planning stage requires extra time and effort when all you want to do is grab a beer and watch Netflix. I’m not saying you need to be a top-level expert. Nor am I suggesting that you need go the whole nine yards on every trip. But for anyone who might travel in less-than-optimal weather, wants to tackle bigger and more serious objectives, or is setting up for a multi-day trip with limited options, the time and energy you spend up front will eventually save your ass.
I’d like to take this opportunity to say thanks to all you readers who have stuck with me over the last few months. The positive response is gratifying, and I’m honored to have been given the opportunity to share some experiences with you. And thanks to the gang at Powder Cloud for their support; if they’ll have me back, I plan to continue this series next season. Have a fun and safe spring and summer.
I’d be willing to bet that most of you do not practice often enough.
Karl Klassen is an internationally certified mountain guide known for developing the avalanche curriculum with Avalanche Canada. He is also the public avalanche warning service manager at Avalanche Canada.